Taking the photographs is only part of the process. A large collection may still need to be reviewed, narrowed down and edited before the strongest images are ready for their intended use.
I can handle different stages of post-production, from culling and basic colour and exposure adjustments to more detailed retouching where required, with the level of work determined by the photographs and your requirements.
You'll receive a more consistent and polished collection while keeping the editing appropriate to the subject rather than processing every photograph in exactly the same way.
Photo Post-Production for Your Photography Session
This page explains what happens to the photographs after you hire me for a photoshoot. Post-production is part of the complete photography service: I photograph the session, make the technical and creative decisions, carry out the initial review and finish the chosen images for delivery.
I don't normally provide post-production as a standalone service for photographs created by another photographer. You may still ask, but third-party files require separate assessment and may cost considerably more because I did not control the lighting, exposure, composition or original capture. My priority is completing the work created for my own photography clients.
What Is Post-Production in Photography?
Post-production, also known as post-processing, refers to the work carried out on photographs after the photoshoot. Taking the photographs is only one part of the photography process; before the final images can be delivered, I also need to review, organise, select and process the photographs.
One of the first stages is culling, which means reviewing the photographs and filtering out clearly unsuitable images. These may include test shots, photographs with missed focus and other technical failures. For most portrait and event sessions, this initial cull is followed by client selection rather than me deciding every final photograph on the client's behalf.
The selected photographs then go through editing. Depending on the service and package, this can include adjustments to exposure, colour, contrast, cropping and other aspects of the image. More detailed retouching may involve additional work on specific parts of a photograph and is different from basic editing.
Post-production is therefore not simply about applying a filter or making a photograph look better. It is the process of turning the photographs captured during the photoshoot into a consistent and properly finished set of images for selection and final delivery.
The amount of work required depends on the number of photographs, the type of photography and the level of editing or retouching involved. For many assignments, post-production can take considerably longer than the photoshoot itself because every photograph has to be reviewed and the selected images processed individually.
What Your Photography Package Includes
Initial technical culling:
I review the photographs and remove clearly unusable frames, particularly missed-focus images, test shots and obvious technical failures.
Basic editing:
The selected photographs receive the adjustments included in your package, such as exposure, colour, contrast and cropping where appropriate.
Consistent delivery:
The completed photographs are exported in a practical format and prepared for their intended use.
Additional retouching where selected:
Advanced or extensive editing is available only when included in the chosen package or arranged separately before I begin the work.
The exact number of photographs and level of editing depend on the photography package you select. If the terminology feels unfamiliar, compare the examples below and tell me how you intend to use the photographs; I can help you identify the suitable option.
How Photo Selection Works
The selection process depends on the type of photography:
Portrait and event photography:
After an initial technical cull, I consolidate the remaining photographs into a private low-resolution PDF. You choose the number of final photographs included in your package, and I then complete the applicable basic or advanced editing on those selections.
Interior and real estate photography:
I normally select the final photographs personally before basic editing. I know which frame best represents each scene, and repeated frames are usually made only after something within the space has been adjusted; the earlier version can therefore be eliminated with confidence.
Photographer-led final selection:
If you prefer me to choose the final portrait or event photographs on your behalf, this is available as a chargeable service. The current surcharge is listed under add-ons and surcharges.
The proof PDF is provided only to help you make your selection. It contains low-resolution, unfinished previews rather than final deliverables and should not be published, forwarded or shown to others. I may deliberately retain an unusual expression, spontaneous reaction or unprepared moment because it could still carry personal meaning for you. Allowing you to choose recognises that the photograph I consider strongest may not be the one you value most.
Phases of Post-Production in Photography
There are generally three phases of post-production in photography. They form the core of the post-production process in photography and they allow photographers to create professional-quality images that meet their vision.
Culling and selection:
I first remove clearly unusable photographs. Depending on the photography genre, either the client selects the final photographs from low-resolution proofs or I make the final selection where my scene-by-scene judgement forms part of the workflow.
Processing:
In the processing phase, the photographer will make any necessary adjustments to the images, such as colour correction, exposure adjustments and contrast adjustments. This phase is where the photographer fine-tunes the look of the images to achieve the desired result.
Output:
In the output phase, the final images are saved and exported in the appropriate format and resolution for the intended use. This may involve creating prints, uploading the images to a website or social media platform, or sending the images to a client.
Why is Post-Production Important in Photography?
Photo editing is an important part of professional photography, but I don't believe it should be used as an excuse for poor photographic techniques. My approach is to achieve the best possible result during the photoshoot by paying attention to lighting, camera settings, composition, backgrounds, posing and other details before pressing the shutter button.
For example, I frequently use professional lighting equipment to control the direction, softness and intensity of light. Good lighting can improve how a person's face and body are presented, reduce distracting shadows and help create the intended atmosphere. These decisions should ideally be made during the photoshoot rather than left entirely to editing software.
At the same time, post-production is a creative skill in its own right. It allows me to refine exposure, colour, contrast, cropping and other details, correct suitable issues and bring out a photograph's full potential. Sometimes, the difference between an ordinary photograph and an interesting one is not elaborate retouching, but a simple crop, slight rotation or carefully considered adjustment.
Understanding Photo Culling
What is Photo Culling?
Photo culling is the process of reviewing photographs and removing images that should not continue through the workflow. It can range from a basic technical cull to a more selective creative review, depending on who will choose the final photographs.
For portrait and event photography, I begin with a basic cull to remove clearly unusable photographs, especially images that are not in focus. I generally avoid eliminating every unconventional expression or unprepared moment because a client may find personal meaning in a frame that I would not have selected artistically. The client then chooses the final photographs from private low-resolution proofs.
Culling works differently for interior and real estate photography. I select the final images personally because I know which frame best represents each scene. When I repeat a scene, it is usually because an object, arrangement or technical detail has changed, making it clearer which earlier frame should be eliminated.
Culling is easy to underestimate because it involves repeated judgement rather than a visible final effect. Separating technical rejection from final creative selection gives portrait and event clients more control over personal preferences while keeping my editing time focused on the photographs included in their package.
Why is Photo Culling Important?
There are several reasons why photo culling is important:
Time-saving:
Culling helps to narrow down the number of images that the photographer needs to review and process, saving time in the post-production process.
Improved workflow:
By starting with a smaller set of images, the photographer can work more efficiently and effectively in the post-production process.
Quality control:
By discarding bad and duplicated images, the photographer can ensure that the final set of images is of the highest quality. People with some artistic sense would seek only the best photographs. Looking through a huge quantity of good photographs would eventually bore the viewers because it's energy-draining and the attention span of a human is short.
Clarity of vision:
Culling allows the photographer to select the images that best capture their vision for the final product, ensuring that the final set of images is coherent and consistent.
Client satisfaction:
For photographers working with clients, culling can help to ensure that the final set of images meets the client's needs and expectations.
Overall, photo culling is an important step in the post-production process that helps photographers to create a final product that is of the highest quality and that meets their vision.
Why is Photo Culling so Time-Consuming?
Photo culling can be time-consuming because it involves reviewing a large number of images and making decisions about which ones to keep and which ones to discard. This can take a significant amount of time, especially if the photographer has taken a large number of images.
Additionally, photo culling requires the photographer to pay close attention to the details of each image, which can be time-consuming. They may need to look at things like focus, composition, lighting and other factors to determine whether an image is worth keeping or discarding.
Overall, the time it takes to cull a set of images will depend on the number of images and the level of detail that the photographer is looking for. However, it is generally a time-consuming process that requires careful review and attention to detail.
How to Do Photo Culling?
The first pass considers whether a photograph is technically usable, including focus, major movement blur and obvious test frames. A closer review may then consider expressions and small details. When several similar photographs remain, the final preference may depend on personal taste rather than one objectively correct choice.
For most portrait and event sessions, I stop short of making every final creative decision and prepare the usable photographs for client selection. If you prefer me to make that final selection, I can apply my experience and visual judgement as an additional chargeable service.
Some photographs that initially appear unsuitable can still be improved through cropping or editing. For example, a distracting person near the edge may be cropped away, or a strong expression may justify adjusting the composition. These possibilities are one reason I avoid discarding borderline photographs too aggressively before the client has seen the private proofs.
Why are There Huge Quantity of Photographs?
Many professional photographers often take multiple shots (can be in burst mode) in anticipation of bad photographs, especially caused by blinking of eyes or movement by the subject.
Getting too many good photographs from a shoot is a happy problem. It means there are more choices and also a higher chance of getting the "perfect" photograph but at the expense of a tedious filtering/selecting job.
The number of photographs for both portrait and event photoshoots can be enormous.
What are Bad Photos?
Several characteristics can make a photograph "bad." Some common issues that can affect the quality of a photo include:
Blurriness:
If the image is not in focus, it can appear blurry and be difficult to see clearly.
Poor lighting:
If the lighting is uneven or too bright or dim, it can affect the overall look and feel of the image.
Composition problems:
If the elements in the image are not arranged pleasingly or effectively, it can detract from the overall impact of the photo.
Distracting elements:
If there are distracting elements in the image, such as clutter or unwanted objects, it can take away from the main subject of the photo. These include "photobombs".
Technical issues:
If there are technical issues with the camera or the settings, it can result in poor-quality images.
Meaningless:
An image can be meaningless if it doesn't make the subject look flattering. Many meaningless images are test shots to test the lighting and composition.
Unflattering:
The subject will look unflattering in many shots due to many reasons, such as partially or fully closed eyes (may be due to blinking), the opening of mouths, bad body postures and untidy outfits.
Overall, a "bad" photograph lacks visual appeal or effectiveness, either due to technical issues or aesthetic problems.
Levels of Photo Editing
Photo editing has different categories and photographers may use different terms. I describe the work as basic, advanced or extensive editing so that clients can compare the amount of work involved.
Photo editing helps to bring out the mood that the photographer wishes to accomplish. Simply editing the colour tone and exposure would change the feel of the photograph entirely. In some cases, the photographs would require some retouching on the subjects to further achieve the goal.
Why not straight from camera?
Most cameras have their own pre-set settings and users may have a few options to select, for example, colour tone, saturation and contrast. The setting will determine the appearance of the photographs on the display screen of the camera. However, the camera (1) cannot remove flaws and (2) using pre-sets from the camera manufacturer will make photographs seem like they are being taken by just any camera owner.
Rule
Do note that post-production work is subject to individual photographers' professional tastes and preferences. Do not request/ demand a professional photographer to follow another photographer's style. Therefore, do engage the services of the photographer only if you like his work.
Slide to see the difference
Before
After
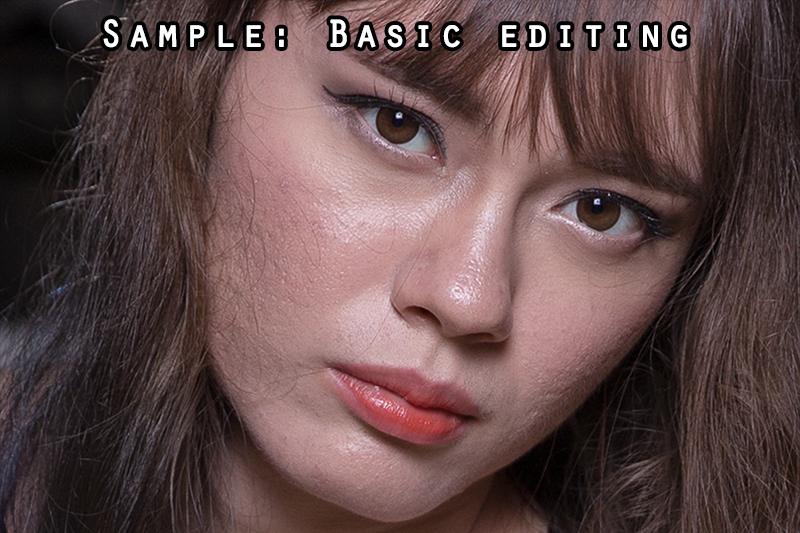
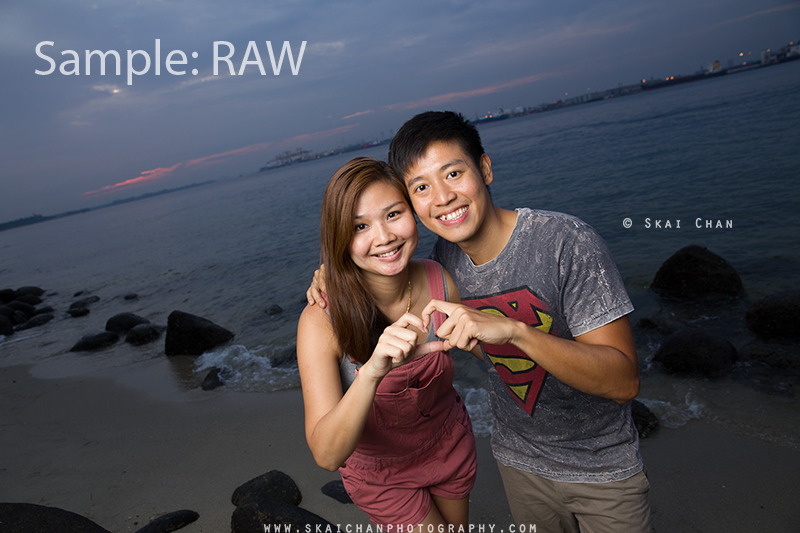
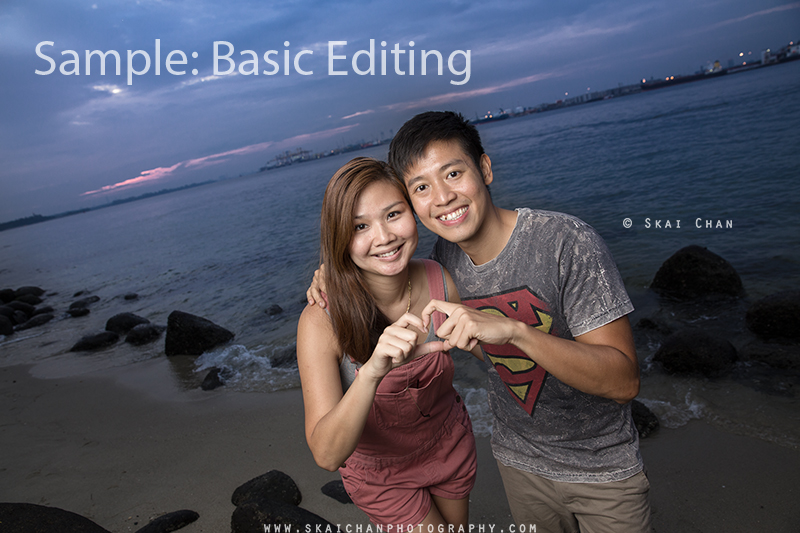
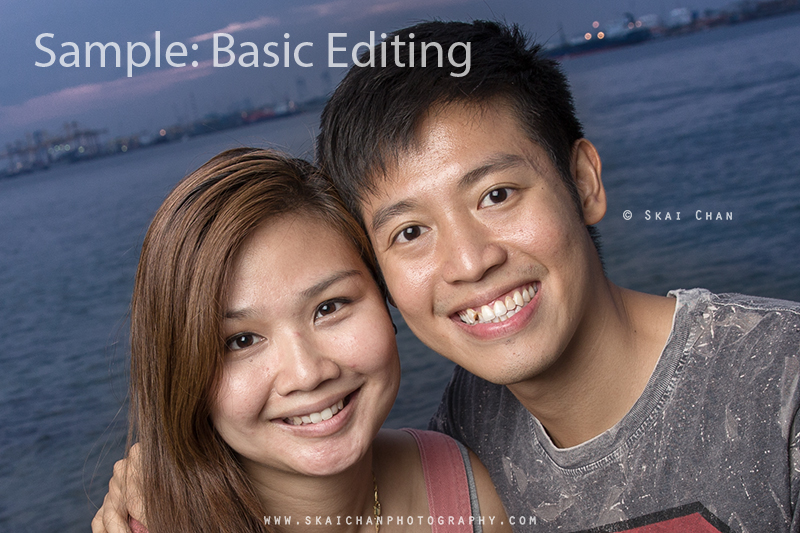
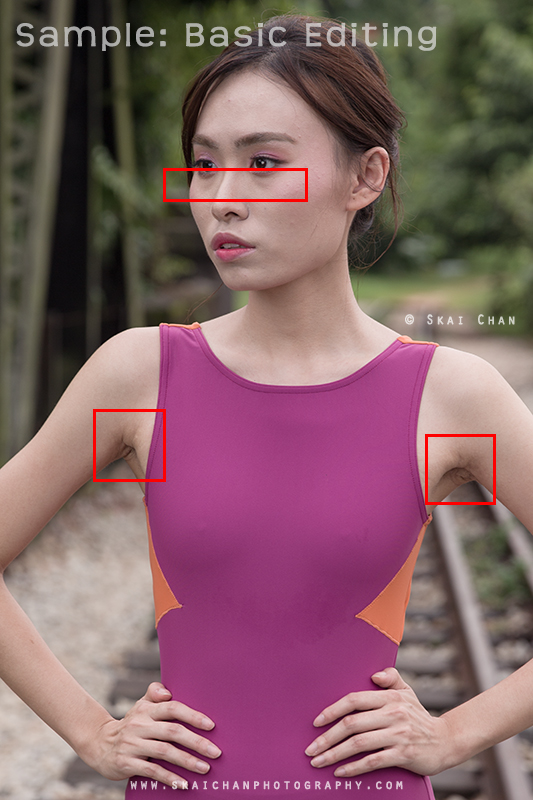
Raw VS Basic edited
Slide to see the difference
Before
After
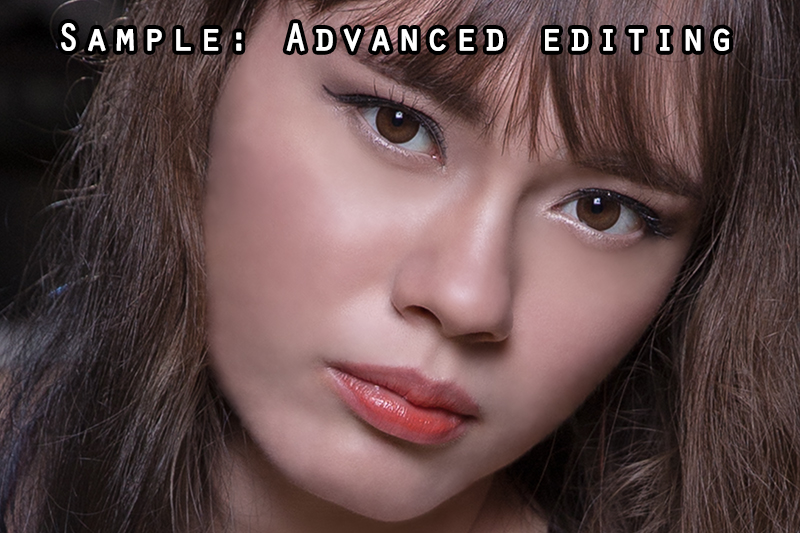
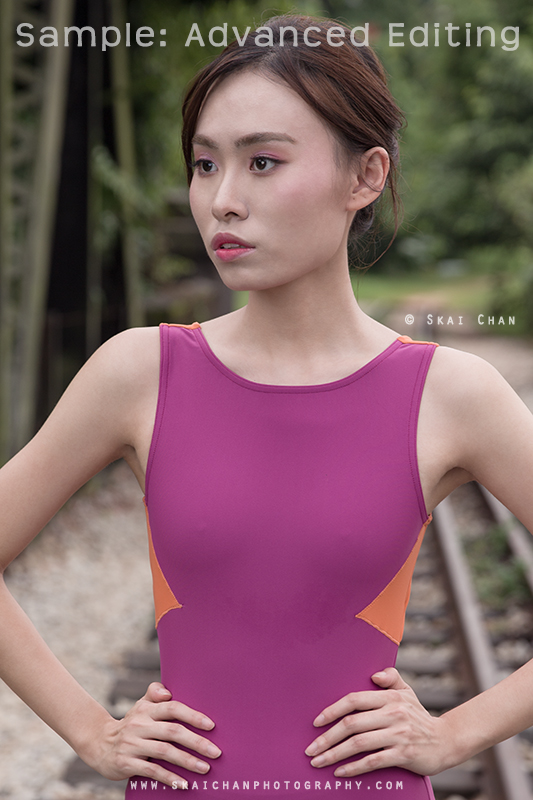
Raw VS Advanced edited
The dimension of the photographs above is reduced for web purposes. The actual size I will give to clients is larger (can be printed) and thus viewers can spot flaws (if there are any) easier.
The editing included depends on the photography package. Packages designed to deliver many photographs, such as event coverage, generally use basic editing because detailed retouching of every image would require considerably more time and cost. Packages with advanced editing include fewer final photographs so that each selected image can receive closer attention. Additional retouching may be arranged where offered and subject to availability.
For portrait photography, professional hair and makeup is beneficial regardless of whether your package includes basic or advanced editing. Good preparation shapes the features, manages shine and colour, conceals suitable imperfections and keeps the result consistent across different angles. Advanced editing can refine the photograph afterwards, but it cannot always make unsuitable or poorly applied makeup look completely natural.
Basic Editing
Colour correction:
Adjusting the colours in the image to make them more accurate or to achieve a specific look.
Cropping:
Trimming the edges of the image to change the composition or to remove distracting elements.
Adjusting exposure:
Changing the overall brightness of the image or the balance between the highlights and shadows.
Adjusting contrast:
Changing the range between the lightest and darkest parts of the image.
It refers to fine-tuning the colour tone, exposure (brightness) and cropping to the photographer's standard.
Even careful exposure and white-balance decisions during a photoshoot may need refinement afterwards. Subjects move, ambient light changes and strongly backlit scenes can exceed what the camera records evenly. Photographs made across different parts of a location may also vary in colour and brightness. Basic editing brings the selected images into a consistent finished collection while retaining my preferred colour, contrast and overall treatment.
Advanced Editing (Skin Retouching)
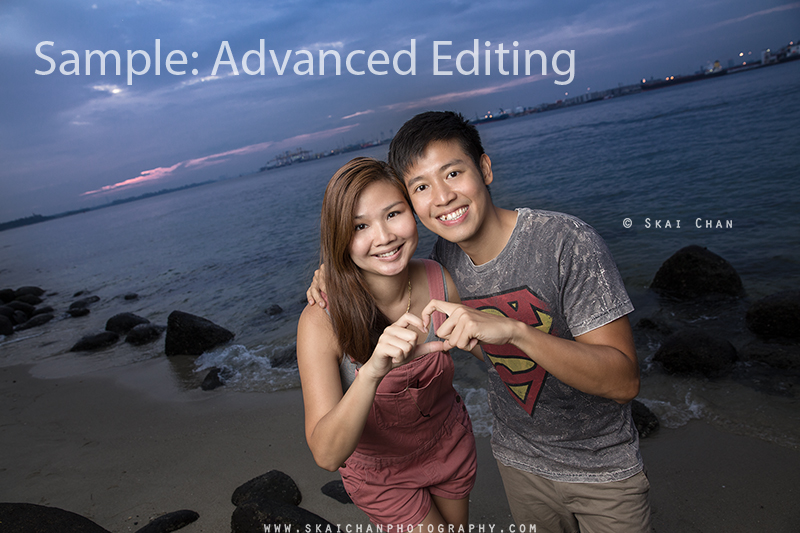
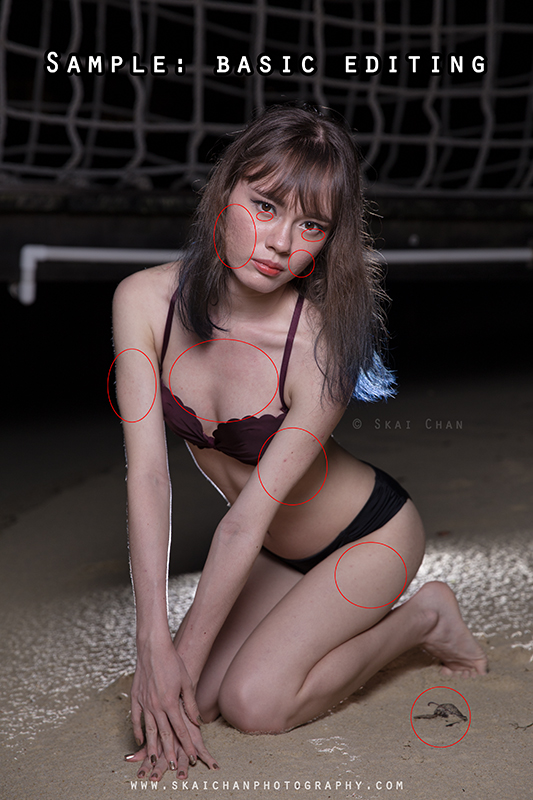
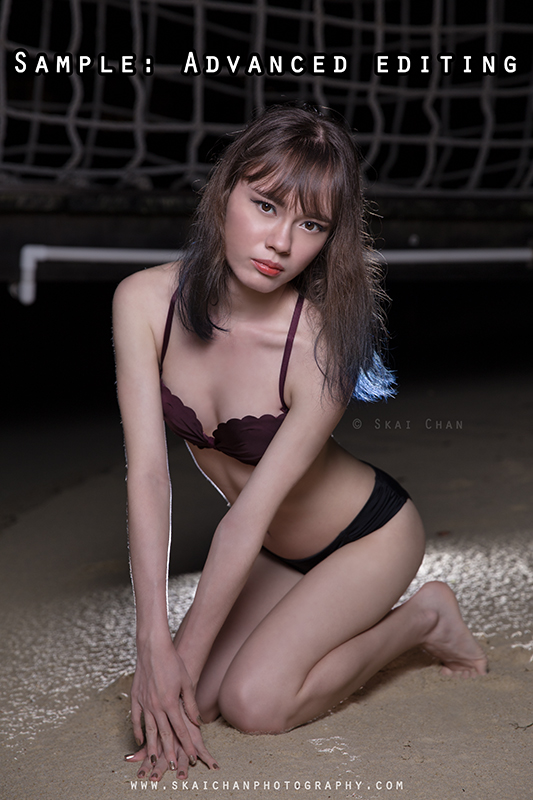
My term advanced editing includes what many clients and photographers know as skin retouching. Other photographers may also use terms such as "refined editing" or "full editing". It can include careful work on blemishes and other temporary skin imperfections, together with small distracting elements in the photograph, such as a patch of dirt.
Slide to see the difference
Before
After
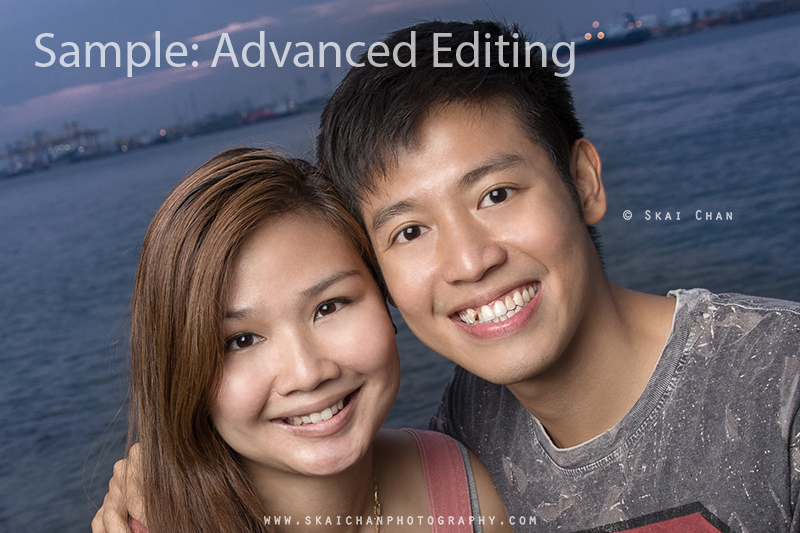
The sample photograph above was taken using a large softbox at an angle near the lens. The flat light did help to smoothen the complexion a little.
Slide to see the difference
Before
After
The sample photograph above was taken using a large softbox at the closest distance possible and thus the lighting has already made the complexion of the models in the RAW file much smoother, otherwise, you will be able to see a bigger contrast between the two types of editing. For the advanced editing, I have tried to keep it as natural as possible since it is just a casual couple shoot.
Slide to see the difference
Before
After
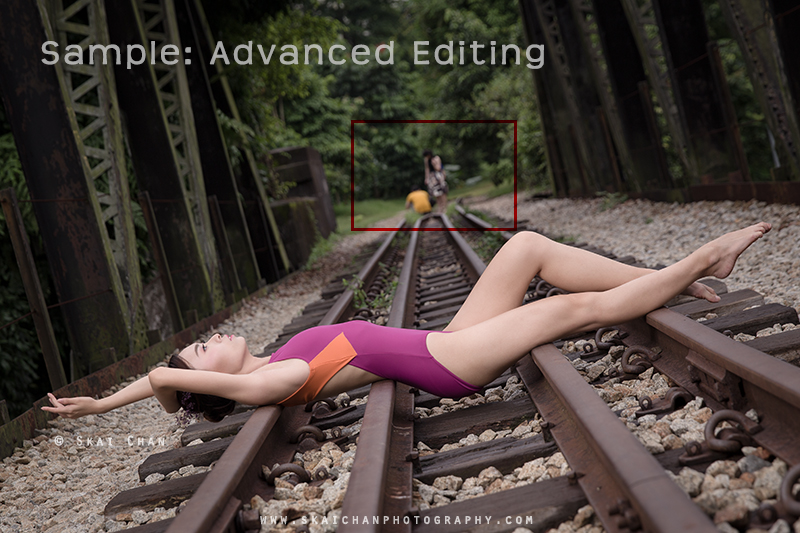
The sample photograph above was first finished with basic and advanced editing. Then the background was cleared up (extreme editing). This is a very simple example of extreme editing to remove distraction, which also makes a big difference.
A high-end portrait photoshoot usually includes skin retouching, such as removal of the usual skin imperfection that includes pimples, freckles, stretch marks, scars and bruises, and rough skin. Of course, some of these may, instead, be deemed as good features by some people.
No matter how skilful a makeup artist is, flaws are likely going to appear inside the photographs, depending on the angle and lighting, and thus will require photo editing. Of course, having help from a good hair and makeup artist will always be better than a normal one. Besides, it also depends on the budget and skill, the makeup artist may even hide scars on the other parts of the body, which will lessen post-production work.
PhotoShop (post-production) work can be easy but doing a good job that makes the photograph looks natural and unedited is extremely difficult and requires a great amount of patience. Smoothening a face is not only about adding blurriness or over-exposing it as most mobile phone applications do. This is why many amateur photographers' portrait works look bad - they flatten the faces or make them look like plastic.
Depending on the required work, skin condition, makeup, hair, clothing and background, a single photograph may take a couple of hours to retouch carefully. This is different from applying an automated mobile-phone effect across the entire face. If a quick beauty filter already gives you the appearance you want, advanced professional retouching may not be necessary for your purpose.
To judge the skill of the photographer, open the edited photograph at its full size and look through every part.
Because advanced editing requires individual attention, it is commonly priced per finished photograph. The before-and-after examples on this page help show what that additional work involves.
Extensive Editing (Previously Extreme Editing)
I previously called this level extreme editing, and that wording remains embedded in some of the older sample photographs and filenames below. I now use extensive editing because it describes the amount and complexity of the work more clearly without suggesting that every alteration must look dramatic.
Slide to see the difference
Before
After
The sample photograph above was first finished with basic and advanced editing. Then the background was cleared up (extreme editing). This is a very simple example of extreme editing to remove distraction, which also makes a big difference.
Slide to see the difference
Before
After
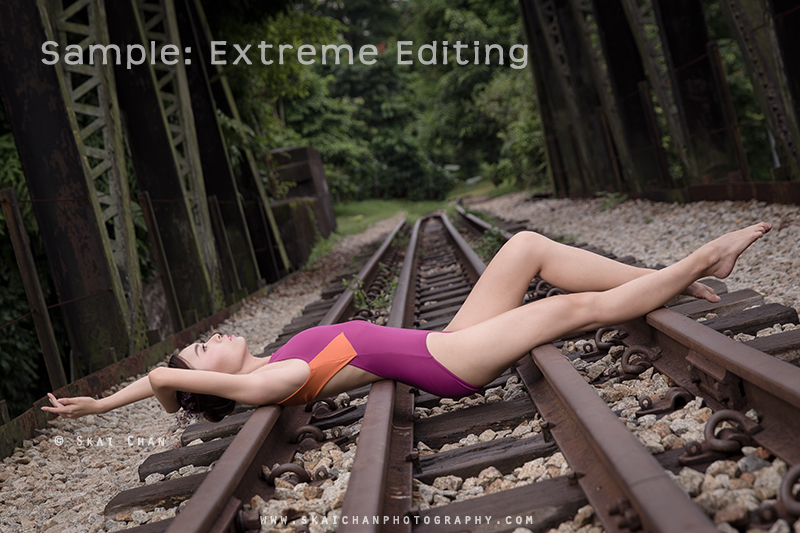
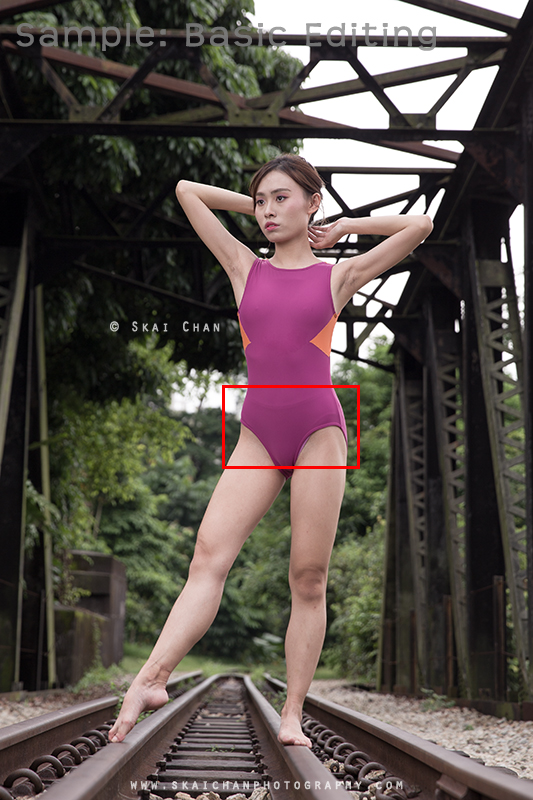
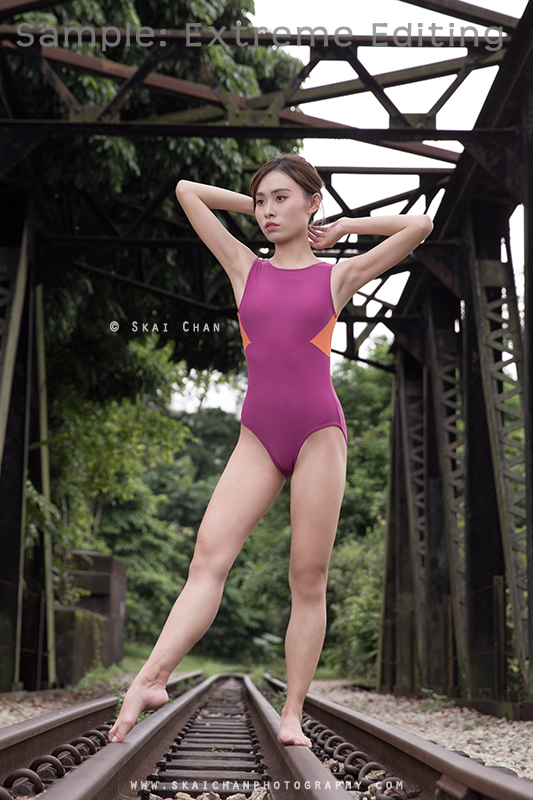
The sample photograph above was first finished with basic editing. Advanced and extreme editing was then applied. Extreme editing was done to remove the panty line (seamless panty could have solved the issue during the actual shoot) and the actual panty that had slipped out of the leotard on her left thigh (right side of photo).
Extensive editing—such as removing, merging or adding objects, reconstructing backgrounds or altering body contours—is time-consuming and may create a dramatic difference when the original and completed photographs are compared. Different photographs also impose different limitations. I have spent more than five hours on a single image involving difficult complexion, makeup, uneven body tones and body-shape adjustments.
Extensive editing is not a standard package service. Some alterations cannot be completed convincingly from every angle or against every background, so I assess requests individually and do not promise a result that may look unnatural. Simpler corrections may sometimes be possible within advanced editing, but they should be discussed before the work begins.
Photo Editing Guides & Resources
How Small Adjustments Can Transform a Photograph
I've always enjoyed experimenting with photographs and exploring different ways to improve them. My artistic curiosity sometimes leads me to revisit an image that initially looks boring, only to discover that it has more potential than I first thought.
Cropping is one of the simplest examples. A photograph may contain unnecessary empty space, distracting objects or a composition that doesn't immediately draw attention to the subject. By cropping away those distractions, I can sometimes create a much stronger photograph without making any complicated adjustments.
Rotation can also make a surprising difference. A slight change in angle may strengthen the lines within a photograph, create a more interesting perspective or give the image a different visual balance. Of course, this doesn't work for every photograph, and rotating an image carelessly can make it worse.
I enjoy this process of trial and error because it allows me to discover possibilities that weren't immediately obvious when I pressed the shutter button. Some photographs can be rescued, while others are almost like hidden masterpieces waiting for a small adjustment to reveal their potential. I consider the ability to recognise and develop that potential part of my professional skill set.
Why I Sometimes Deliberately Underexpose Photographs
Some photographs may appear too dark or too bright before editing, but that doesn't always mean the exposure was a mistake. There are situations where I deliberately adjust the exposure to preserve important image details or achieve a particular result during post-production.
For example, imagine photographing a room with a very bright window or light source. If I expose the photograph primarily for the darker interior, the bright area may become completely white, losing details that cannot be recovered later. In such situations, I may deliberately underexpose the image to protect the highlights, provided the camera can retain enough information in the darker areas.
During post-production, I can brighten the underexposed portions while attempting to preserve detail in the bright areas. RAW files are particularly useful for this because they generally provide more flexibility for exposure adjustments than JPG files. However, this technique has limits: brightening shadows excessively can introduce noise, while severely underexposed details may not recover cleanly.
I may also intentionally use a brighter or darker exposure for creative reasons, depending on the subject and atmosphere I want to achieve. The photograph captured by the camera may therefore not represent the final appearance I have in mind. Someone viewing it without understanding my intention could mistake a deliberate decision for an exposure error.
My Approach to Colour Temperature
One aspect of photo editing that I pay particular attention to is colour temperature. In general, I prefer balanced, neutral-looking colours rather than deliberately adding strong colour casts to every photograph. I feel that this approach helps photographs remain visually appealing over time, even as editing trends change.
Some photographers favour distinctive colour grading, such as adding purple, green or other tones to create a recognisable style or brand identity. There's nothing inherently wrong with that. Different photographers have different artistic preferences, and certain colour treatments can work beautifully for particular concepts.
However, I personally prefer a more neutral starting point because I believe it gives photographs a better chance of remaining stylish ten years later. That doesn't mean I always make photographs look cool or remove every trace of warmth. If a scene is naturally illuminated by warm orange lighting, I may preserve that warmth because it contributes to the atmosphere.
I also consider the client's objectives when deciding how the final colours should look. For example, I once photographed a residential property for a real estate client who preferred a more neutral, slightly cooler appearance. She felt that the original warm lighting made the house look less premium or high-class, and she wanted the photographs to present the property differently.
Her preference was understandable because the photographs were intended to market the property, and the desired impression mattered. I therefore don't believe there is one colour temperature that suits every photograph. My preference for neutral colours is a general approach, not a rigid rule that overrides the scene or the client's reasonable requirements.
Ultimately, good editing requires judgement. The objective isn't to make every photograph look identical, but to produce an appearance that suits the subject, purpose and atmosphere while remaining visually pleasing. The appropriate work may range from basic editing to advanced editing or skin retouching; knowing when to stop is just as important as knowing how to edit.
Two Schools of Thought on Photo Editing
There are two extreme schools of thought on photo editing. Of course, some people are more neutral or aren't too outspoken about it but that's for another topic.
Please Photoshop me well
My most frequent encounter while doing photography is having the guests/ subjects (during events) request me to edit their faces well. I've also encountered being requested to remove casual photographs taken during a friend's housewarming party (I don't do advanced editing for these), and to my best understanding, due to the ladies wanting to maintain their looks (self-edited) in their social media profiles.
Photo editing APPs are also popular among people who frequently share their photographs and videos on social media. Most mobile phones also have default software that modifies/ beautifies faces automatically (default setting). There are also mobile phone users who only use certain APPs (eg. Meitu) for a selfie because somehow the APPs can take "better photographs" (auto photo editing).
These show that people, in general, are more inclined to have their faces edited in photographs. It may be light photo editing, such as smoothening of their skin and removal of pimples, or more extreme ones, such as enlarging their eyes or turning their chin into a V-shape.
There's nothing wrong with people wanting to look better on social media. It may help to boost their confidence, which is one of my goals in portrait photography. The possible drawback is some people may criticise the changes as being too artificial.
I love my imperfection
Some people do consider the imperfections on their faces as unique features. There's nothing wrong with people who love freckles, stretchmarks or even scars (some girls do think men with scars look more masculine). It's good that people are feeling very comfortable with themselves. Besides, one of my goals in photography is to bring confidence to people; hence, this group of people have already reached the level of confidence that can bring happiness to themselves.
I do have some extreme encounters with such kinds of people.
The first unfortunate incident involves a project to create an album to target a specific group of potential clients and also to showcase my photo editing skill. The volunteer model (a plus-sized non-model) went through my work and agreements, without stating any concern/ request at all. She received a professionally taken and edited album for free without giving me any feedback. A year later, I realised she had been grumbling behind me about how I had made her look too perfect (less bulky and all scars and stretchmarks removed).
The next incident occurred after I included a caption on my new Instagram post to encourage people to have their photographs taken because professional photographers could do wonders to help them. My casual writing was a direct response to friends who had been reluctant to do portrait photoshoots, stating flaws, such as pimples, scars and stretch marks. Someone took words out of context and started accusing me of insulting others because she thought the mentioned imperfections weren't flaws.
Necessity for Advanced Photo Editing
Since advanced photo editing requires more time and effort, the price is much higher than basic editing. There are some situations where advanced photo editing is highly recommended, but after all, it depends on the budget of the client. That means advanced editing can be requested even for just a personal photo album.
Size of photographs to be viewed at
Photographs that are produced by DSLR can be extremely sharp and have high resolution. They have more details than photographs taken by a camera phone (small sensor size). Therefore, if you view a photograph taken by a DSLR on a large screen or poster (printed out), every tiny flaw can become very obvious.
Fortunately and unfortunately, if you are planning to upload the photographs strictly only into your social media profiles (don't regret it in future), some flaws may not be obvious since social media platforms like Facebook and Instagram usually reduce the resolution of the uploaded photographs. Taking an extreme example, if you are taking a photograph to make your identification card (ID) or passport, eventually, the printed version of your face on the small document likely won't show the tiny flaws on your face because the resolution of the printed document is usually very low and much details have been lost.
Purpose of photographs
If the use of the photographs is for professional purposes, such as commercials, it's highly advisable to apply advanced editing. If a company requires photographs for marketing purposes, having professionally retouched photographs would leave a better impression on potential customers. Important photoshoots such as pre-wedding and modelling portfolio will require it as well, for the viewers may scrutinise the photographs a lot.
Your view on your imperfections
Do you put on makeup before going out? Do you use any phone app to edit your photographs? If you answer yes to any of these questions, you're interested in getting your imperfections removed from your photographs and thus you want advanced editing for your photographs.
Of course, if you truly treat the common imperfections on your face and body as merits, you probably don't need any photo editing to remove them.
Makeup VS Photo Editing
Makeup has some purposes - (1) to conceal your imperfections like eyebags, acne and scars, (2) to highlight your features, (3) to shape your face and (4) to improve vitality (colour). The majority of the photographers aren't makeup artists and although they can conceal some imperfections in Photoshop, they likely don't have the expertise of makeup artists to do the rest.
Unfortunately, even with the help of a good hair and makeup artist (HMUA), your imperfections are likely to appear on photographs and they require advanced editing to be removed.
Let's take for example, if a certain imperfection isn't concealed during the makeup, the photographer/ retoucher would have to edit away the same flaw on all photographs. The more photo editing work is done, the higher chance for mistakes to appear. Due to different positions/ angles of the subject and lighting, editing work would be required at different parts of the photographs, where photo editing work can be made more difficult. It's difficult to do the same editing on multiple photographs and thus the area may appear to be different. Eventually, there's a higher chance for viewers to catch mistakes or simply guess that the photo is "Photoshopped" (not natural).
Both makeup and photo editing work side by side to improve the quality of photographs.
Photographer VS Retoucher
A person who does the photo editing (enhancing/ retouching) job is a retoucher. Most freelance photographers in Singapore do their editing. Photographers who are in very high demand may outsource the photo editing job to a retoucher so that they can freeze up more time to take up more photography projects. Photography companies may also spilt the tasks (photography and photo editing) to dedicated in-house talents.
For basic editing, all photographers and photography companies have their unique preferred adjustments for their photographs. For example, some photographers add a purplish or green colour tone to the photographs and some prefer to have a higher clarity level or contrast; some photographers may also like to brighten or darken the shadows to create different moods. The sets of rules can be followed easily, unlike advanced editing.
Photographer as retoucher
The actual photographers know best what needs to be adjusted and edited on the photographs to their standard. For example, some photographers may underexpose the photographs on purpose so that certain parts of the photographs will not be over or under-exposed, thus losing details. He will be able to produce consistent quality work throughout if he's doing the photo editing work himself so that clients won't be shocked after receiving the photographs.
However, for the sake of privacy, it will be better if the photographer is doing the photo editing work, especially for art or glamour photoshoots.
Retoucher
If the photo editing job is handed over to a third party, a retoucher, the photographer or the photography company may give instructions on what to be edited. Without a doubt, some retouchers may have superb photo editing skills while not all photographers are good at photo editing. I believe in "practice makes perfect". After all, photographers should try to focus on creating the photographs and also try to get everything right during the actual photoshoot to minimise photo editing work.
JPG VS Camera Raw
Most DSLRs can generate two types of file formats - JPG (*.jpg) and camera raw (eg. *.ARW, *.CR2). Most professional photographers prefer to work with camera raw files but some choose JPG files since they do not intend to do much (or any) post-production work after the photoshoot.
JPG files are usually the image file format that photographers would return to their clients. They have many advantages. They are light-weighted (smaller file size), contain sufficient details for viewing pleasure and can be viewed on most devices like computers and mobile phones.
Camera raw files are unprocessed image files that contain more details and thus have more room for adjustments (can tolerate a higher level of errors during the shoot). One example is when you try to brighten a JPG file during post-production, the underexposed parts may remain dark and more noise may appear; whereas a camera raw file has more margins for adjustment and there will also be less noise appearing on the photograph. However, they have much larger file sizes and thus are disadvantaged in storage and speed of navigation.
RAW files are part of my working process rather than the finished photographs delivered under standard packages. For a fuller explanation of the differences, professional concerns and my policy, read why photographers don't usually provide RAW or unedited photographs.
Photo Editing: Mobile Phone VS Computer
Most non-photographers assume photo editing work is simple and fast. One cause of the wrong assumption is the ease of photo editing apps on smartphones. There's no single master key to edit all photographs, except for presets for some basic settings, since every photograph requires different adjustments.
Without a doubt, the hardware of mobile phones and the capability of photo editing apps have improved over the years and you can easily do basic editing on mobile phones, such as adjusting the exposure, colour temperature... etc. However, the professional way of editing photos is still very much dependable on a computer (desktop/ laptop) and mainstream software like Adobe's product. It's about efficiency and detailed editing.
Speed of loading
The hardware of a computer, in general, is better than mobile phones. With the advancement of technology, although some mobile phones can view and edit raw files that are huge in file size, the speed of loading the files and making changes is likely to be slower than a computer.
Convenience/ ease of editing
The use of a keyboard with a mouse/ pen mouse is easier than using fingers or a stylus, especially on a small screen.
Detailed editing
The computer screen and monitors are much larger than the phone's small screen. You can further zoom in many times on a computer to take out tiny flaws.
Batch photo editing
Loading multiple files is taxing on the hardware. In general, desktops and laptops have stronger hardware and are more capable of handling any batch editing better than mobile phones.
How Long Does It Take Photographers to Edit Photos
The time it takes for photographers to edit photos can vary widely depending on several factors:
Number of Photos:
Small Sets: For a small set of 10-20 photos, it might take a few hours to a couple of days.
Large Sets: For larger sets of 100-200 photos, it could take several days to a week or more.
Type of Editing:
Basic Editing: This includes adjustments to exposure, colour correction, and cropping. Basic editing typically takes 5-10 minutes per photo.
Advanced Editing: This involves more detailed work such as retouching skin, removing blemishes, and complex adjustments. Advanced editing can take 30 minutes to several hours per photo.
Workload of the Photographer:
Busy Periods: During peak seasons like weddings or holiday portraits, photographers may have a backlog, extending the editing time.
Off-Season: During slower periods, turnaround times might be faster.
Photographer's Workflow:
Efficiency: Experienced photographers often have a streamlined workflow and can edit faster.
Quality Control: Photographers like Skai, who take breaks and review edits with a fresh mind, may take longer to ensure top quality.
Client Requirements:
Selection Process: If clients need to choose their preferred photos first, this adds time to the process.
Customisation: Specific client requests for certain edits or styles can extend the editing time.
Event Photography: For events like weddings, it's common for photographers to spend 2-4 weeks editing.
Portrait Sessions: For individual or family portraits, the editing process might take 1-2 weeks.
Conclusion:
Overall, the editing time for photographers is influenced by the complexity of the edits, the volume of photos, their current workload, and the specific needs of the client. Professional photographers aim to deliver high-quality results, even if it means taking a bit more time to perfect each photo.
Why Choose Skai for Photo Post-Production
The person making the photographs also makes the final editing decisions. Because I was present throughout your session, I understand the intended lighting, mood, flattering angles and purpose of each image instead of receiving the files without that context.
One photographer throughout the process:
I handle the photography, initial technical culling and final editing personally. Where the package uses client selection, your choices determine which photographs I complete.
Natural-looking decisions:
My aim is to refine distractions without automatically smoothing away every line, mark or characteristic that makes someone recognisable.
Careful quality control:
I compare similar frames, inspect important details at full resolution and revisit an album rather than relying on a one-click filter.
Privacy-conscious workflow:
I don't routinely pass client photographs to an unknown third-party retoucher simply to reduce my workload.
Editing matched to the purpose:
An event collection, a personal portrait and a polished commercial image do not require identical treatment. The appropriate package depends on how the photographs will be used.
This does not mean changing every feature or making you look like someone else. We can discuss characteristics you want retained—such as freckles, moles or stretch marks—before the photoshoot.
Items that May be Included for Advanced Editing
Below are details that may be addressed through advanced editing or skin retouching. Professional hair and makeup can reduce the amount of correction required, but it does not remove the need for retouching in every photograph. Conversely, unsuitable or poorly applied makeup may be difficult to correct naturally even with advanced editing. I therefore try to balance refinement with a result that still looks believable.
Strands of hair covering face
Small strands of hair covering the face or eyes will make the photograph look unpresentable. The flow of hair should be in a uniform direction. Hair being separated in certain conditions, for example, forming a "hole" (can be circular or triangular) won't look good. For certain angles, the ear should not pop out from the chunk of hair, which will look like mickey mouse. In many cases, such photographs have to be given up because it's too difficult to be edited to look natural.
Not-so-nice complexion
This is pretty straightforward. Pimples, acne or scars won't make the photo looks nice. Depending on the condition of the face, the time taken to touch up varies. Even with the help of a good makeup artist, the photographer will very likely need to touch up a little due to the angle of lighting but things would be so much easier.
Extreme uneven skin tone
This happens frequently when no makeup artist is involved. Most models who know how to do simple makeup will tend to overlook it when they apply foundation on their faces, such that the face and neck have different colour tones.
Scars and bruises on body parts
For a commercial photoshoot, the makeup artist will cover them up during the makeup session. However, for a non-commercial shoot where the budget is much more limited, most makeup artists won't do such a tedious job.
Stretch marks
Most people, regardless of body type, do have stretch marks. People with more body fat and pregnant ladies will have more. Most people are concerned with stretch marks because it does give viewers the impression that they are fat. However, I've also come across a handful of girls who treat stretch marks as unique features.
Moles and freckles
Similar to stretch marks, some people prefer to leave them untouched. Eventually, it depends on the purpose of the photographs to determine the editing.
Panda eyes
The dark eye bags would give viewers the impression that the subject is weak. Panda's eyes should at least be brightened. This is why the model needs a good rest the night before.
Yellowish teeth
Yellowish teeth are quite common for models who love drinking tea or coffee. It may give a dirty feel to the photographs. If necessary, the teeth can be whitened to an extent.
Dark armpits
Depending on the outfit, sometimes, armpits can be revealed and dark armpits can be very distracting.
Composition
Most non-advanced cameras have around 97% view on the viewfinder and thus the photos taken will be larger than the intended ones. Therefore, some cropping may be needed for some photographs. In many situations, the perfect composition would be sacrificed during the photoshoot to capture some once-in-a-lifetime moments/expressions; therefore some cropping will be required eventually to perfect the photographs.
Basic editing: Lighting (exposure) and colour (white balance)
The technology of cameras is not good enough to determine which is the real "white" colour. Therefore, the overall colour tone will tend to lean towards a certain tone. During the shoot, a white balance card may be used to set it. However, any change of light may change the white balance again. Therefore, setting a correct white balance is almost inevitable during post-production work, especially if a certain mood (colour tone) is expected.
There is also no perfect lighting condition for any photoshoot. Therefore, some post-production work may be required to darken certain spots that are too bright and also brighten some that are too dark. Different skin tones will also affect the exposure. Lastly, it's never easy to get perfect exposure unless a light meter is used, which is expensive and time-consuming. Furthermore, it's impossible to judge the exposure properly on the small LCD screen on the back of the camera.
I'm in for a discussion if the client doesn't want any body parts to be edited, such as freckles and moles. Just wink at me and we can pillow fight over it before the start of the photoshoot.
My Usual Procedure for Post-Production
After every shoot, I will need to upload the photographs into my computer and external hard disk. Some very established photographers may even have two or three external hard disks or even include cloud service.
The crucial rule of doing post-production work is to stop working when fatigue hits; no one makes the best judgment in a bad state. Going through photographs makes eyes tired and the decision to adjust or remove every photograph tires the brain out. In many cases, slight editing of a photograph makes a big improvement that it may give a wrong impression that the work is already perfect; but often, when you go through the photograph again, you may realise that something can be further done to improve it, by a small margin perhaps. No doubt, sometimes, it's just an artist's bad habit to overdo it.
Below is my current general workflow for portrait and event photography. Interior and real estate photography differs because I normally select the strongest final frame for each scene myself before completing the basic editing.
Transfer the RAW photographs to my computer
Rename and organise the files in sequence
Back up the original files
Perform an initial technical cull, particularly for missed focus and clearly unusable frames
Retain viable spontaneous or unprepared moments that the client may personally value
Prepare the remaining photographs as a private low-resolution PDF
Send the PDF to the client for selection
Confirm the selected number of final photographs and applicable editing level
Complete the basic or advanced editing on the selected photographs
Review the finished photographs for colour, exposure, cropping, expressions and consistency
Export the final high-resolution JPG files
Upload and provide the secured delivery link to the client
Client selection keeps the final collection personal: you may prefer an expression, gesture or moment that differs from the image I would choose based on technical or artistic considerations. It also allows me to concentrate detailed editing on the agreed number of final photographs. If you want me to make the final selection, I can provide that professional curation for the surcharge stated on the rates page.
Post-production is part of my authorship and quality control, so I don't hand the unfinished work to a client to complete on my behalf. If personal editing control or access to RAW files is essential, my service may not be the right fit; you can read why photographers don't usually provide RAW or unedited photographs.
Contribution to the Length of Post-Production Work
The time I would need to spend to give my clients the final photographs are greatly influenced by various factors.
My schedule, including personal commitment
I usually work on my photoshoot albums based on the first-come-first-serve principle to be fair. Therefore, if I'm already "owing" many clients their photographs before the photoshoot, it will take a longer time for me to even get started with the latter albums. I also have my personal life - partner, family, friends, other hobbies and investments.
Availability of my consultant
For some photo albums, especially for portraits, I may consult my wife, the HMUA involved or even my advisor (makeup artist Tricia Lee) for a second opinion, especially if I need the point of view from a female. Since none of them owes me anything, I don't have the right to rush them, which means the post-production may be delayed by a few days.
Number of photographs snapped
Culling photographs isn't as simple as most non-photographers think. The more photographs I take during the photoshoot, including test shots, the longer time I'll need to filter the photographs. On the other hand, having more photographs to select from, the final photographs will have better quality.
Number of final photographs required
This is pretty straightforward. The number of final photographs I'm going to produce will highly influence the time to be taken, especially for photographs that require advanced editing. Each photograph may require, on average, 1.5 hours, depending on the skin conditions of the subject(s), the amount of skin revealed, the quality of makeup and hairstyling and many other factors.
To sum up, the more photographs with advanced editing the client needs, the longer time it will take to finish the photographs.
Quality of hairstyling and makeup (for advanced portrait editing)
It is not only time-consuming but also frustrating when no professional hair and makeup artist (HMUA) is involved, especially when the model does not have a good complexion. The easiest and fastest way to solve the complexion problem is to blur out the model's face but it will create a fake plastic look. This is what most girls are doing in their photographs when free mobile phone applications are so common. My style is to zoom in to remove tiny flaws and minimise the amount of blurriness to be applied on the face - it just takes so much more time but can produce more natural photographs. Strands of hair cutting across the eyes and face usually give me the most headaches.
My performance
The photographer, which is me, does make mistakes sometimes as well. Some "mistakes" are unavoidable due to various constraints. I always try to spend time figuring out how to "save" the better photographs. Thus, my effort and time to be spent on photo editing will also be a lot more.
Season of the year
Workload changes throughout the year. During busier periods, I may have several previously booked albums to complete before beginning a newer project, so the expected delivery period should be considered before confirming a time-sensitive session.
Photo Editing Gone Wrong
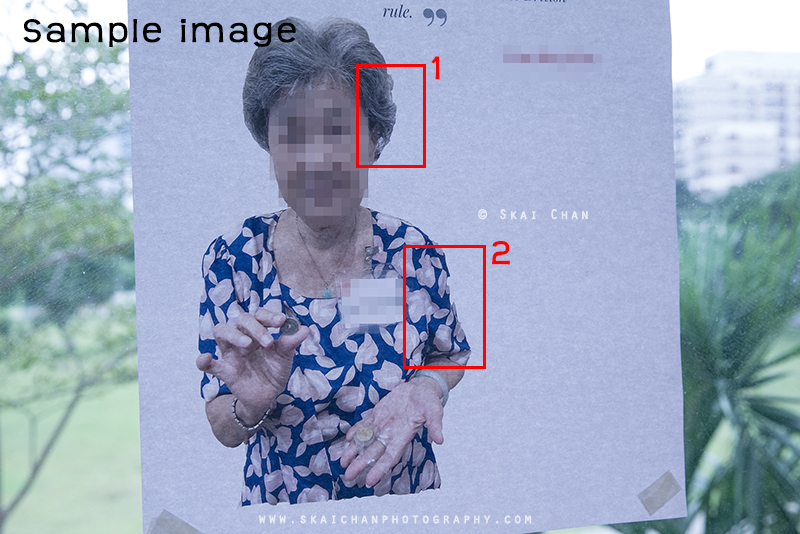
The photograph of the poster was taken by me during one of my event shoots. I added mosaic to the face and nametag.
1) The original photograph was taken with a camera phone.
2) The messy background was cropped away to make it white.
3) The edited photograph was printed on A4 size paper as a poster.
4) The poster was then pasted onto the glass window.
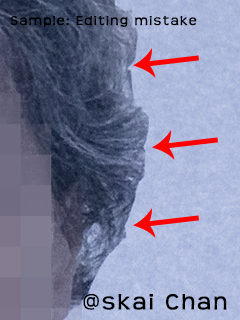
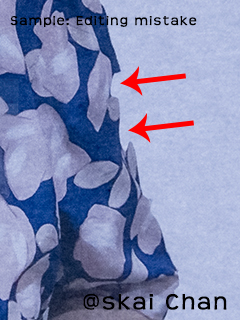
There are two obvious mistakes in the editing (cropping of the lady). Firstly, The hair was cropped unnaturally. Secondly, parts of the shirt were cropped away. The editing work was not done by a professional photographer, retoucher or designer. I assume it was a very quick job.
You get what you pay for.
Since the posters were meant for a non-profit event and there was a huge number of them, the quality of the editing wasn't a big issue. For such small community projects, paying for professional work (it costs a lot) would not serve the purpose - the money can be better spent on the less fortunate people instead. On a side note, since the original photographs were not professionally taken, it didn't worth the effort to do any professional editing on them.
Nevertheless, if the poster is meant for commercial purposes, it would have greatly tarnished the reputation of the company.
Above is an example of how editing work has gone wrong. Look at the gate in the background - the straight lines make it so obvious that the person has edited the body of the lady.
Pricing & Packages
Post-production for photographs I create is priced through the photography package you select. Basic editing is included where stated, while advanced retouching, extensive editing and additional finished photographs require substantially more individual work and may incur additional charges.
The appropriate option depends on the number of final photographs, their intended use, the required level of detail, complexion and hairstyling, clothing or background distractions, and whether complex alterations are realistically possible. Some issues are faster and more natural to prevent during the photoshoot than to reconstruct afterwards.
Please review my photography rates and packages for the current inclusions and editing options. Work on photographs created by another photographer is not a normal package service; if I agree to assess such files, availability and pricing will be quoted separately and may be considerably higher.
FAQ
Is Post-Production Right for You?
What is the difference between pre-production and post-production?
Pre-production in photography is the planning and preparation stage, while post-production is the stage where the images are fine-tuned and adjusted to create the final version.
Can you edit photographs taken by another photographer?
I normally provide post-production only for clients who hire me to photograph their session. You may still ask, but third-party files require separate assessment and I may decline them. If I do accept the work, the fee may be considerably higher because I did not control the original lighting, exposure, composition or file quality.
Editing & Retouching
Will my photographs be edited by you?
Yes. I handle the initial technical culling and final editing myself so that the completed photographs remain consistent with how I planned and photographed the session. For most portrait and event packages, you select the final photographs from a private low-resolution PDF before I edit them. For interior and real estate photography, I normally make the final scene-by-scene selection myself.
I have a very bad complexion. Can photo-editing fix it?
Yes. However, do note that if your complexion is bad, the edited photograph may not look as real as others'.
You can see samples on my website to roughly gauge what you will get.
Can you edit (Photoshop) me to become slimmer?
My photography style is to make my models look slimmer during the shoot. I can make you look even slimmer in Photoshop but it also depends on the background.
Can you edit away my stretchmarks?
Yes. It's included in advanced editing.
Can you not do any editing on my photographs?
We can avoid advanced retouching if you prefer a more natural result. However, this is different from supplying unprocessed RAW files: the selected photographs still normally receive the basic colour, exposure and output preparation included in your package. Read why photographers don't usually provide RAW or unedited photographs.
Packages & Booking
Who selects the final photographs?
For most portrait and event packages, I first remove clearly unusable photographs and provide the remaining images in a private low-resolution PDF for you to choose the final photographs included in your package. For interior and real estate photography, I normally select the strongest frame for each scene myself. If you want me to make the final portrait or event selection on your behalf, this is available at the surcharge listed on the rates page.
Why is advanced editing much more expensive than basic editing?
There's no "one-click button" to do advanced photo editing. It requires much longer time and effort to make the photographs look natural, so that nobody can spot that it's being "Photoshopped", especially after zooming in. It may take 1.5 to 2 hours for every photograph, depending on the skin condition, amount of skin shown and many other factors.
I will put in my best effort because every photograph is going to be part of my portfolio.
Why are some photographers charging much cheaper for photo editing?
Editing prices reflect differences in time, experience, workflow, level of detail and whether the work is completed personally or outsourced. A quick automated treatment and detailed natural-looking retouching are not equivalent services, so compare full-resolution examples and clarify exactly what is included rather than judging by price alone.
Can I send you a photograph and you merge the person into the photo taken by you or vice versa?
No, I'm not an expert in this kind of editing. Both the angle and quality of lighting, the colour tone/contrast and the photo resolution are likely to be very different in the photographs and thus, it will be obvious that they are photoshopped inside. Therefore, I don't take up such kind of job even if you aren't expecting a good job.
For general questions about booking, payment, preparation, editing, delivery and privacy, visit the main photography FAQ.
Booking
Choose the photography session and package according to the number of photographs and editing level you are likely to need. If you are unsure, tell me the purpose of the photographs, where they will be displayed or printed, your preferred level of retouching and any characteristics you want retained. I can then explain which existing option is suitable before you confirm the photoshoot.
Post-production requests are best discussed before the session. Some changes affect the lighting, makeup, styling, posing, background and time needed during the actual shoot, and planning them early can produce a more natural result than trying to repair everything afterwards.
I would like to thank all the kind people who gave me consent to display their before-and-after images here to educate everyone. Thank you, thank you, thank you!
♥
Enjoyed This Article?
I've been sharing photography tips and experiences since 2012. If this article helped you, here are a few ways to show your appreciation.

 Scan QR to visit this website