Flash VS Natural Light Photography
Lighting in Photography
Lighting is the most important part of photography. It sets the mood, shows emotion, and brings out the best in the subject. Even with good composition and skill, poor lighting can make a photo look weak.
There are two main types of lighting. Natural light comes from the sun. It gives photos a soft, warm feeling and often looks very natural. Flash light is controlled. It helps when the place is dark and adds brightness and clarity to the photo.
Both natural light and flash have their strengths. Natural light is gentle and emotional. Flash is powerful and precise. Knowing when to use each one helps create photos that look polished and meaningful.
Natural Light Photography
Natural light comes from the sun, and it gives photos a soft, warm look. Many people confuse ceiling lights or indoor lamps with natural light, but they are not the same. Sunlight makes portraits feel real and full of life.
The best times to use natural light are during the golden hours — just after sunrise and before sunset. At these times, the light is gentle and flattering. Whether outdoors or near a big window indoors, natural light adds emotion and depth to your photos.
By learning how to use sunlight well, you can create portraits that look authentic and meaningful. Natural light is simple, but it can make your images shine with beauty and honesty.
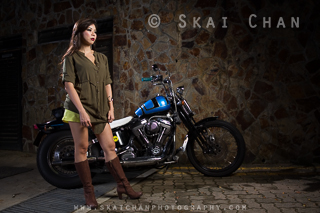
Flash Photography

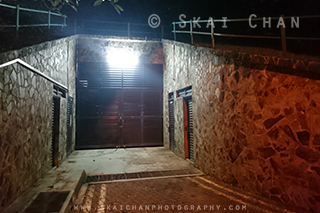
▲ Outdoor off-camera flash photography. The building details are shown clearly because of the added light. We had enough time to set up professional lighting in this area.

▲ Outdoor on-camera flash photography. The fill light brightened the models' faces. Without it, their eyes and features would look much darker. This shoot was done quickly while moving between locations, so we used on-camera flash instead of a large softbox.
(This photo was taken on a hazy day.)
Flash photography is a powerful tool that helps in many situations. In dark places or at night, flash adds the light needed to make subjects look clear and beautiful. But flash is not only for low light. Even in daytime, it can reduce shadows, add drama, or make the subject stand out.
Not all photographers use flash, and fewer know how to use it well. It takes practice to control the strength and timing of the light. Done right, flash creates polished, professional images that look striking and memorable.
With flash, you can shoot confidently in any condition. It opens up creative options and ensures your portraits look refined, whether day or night.
How Flash Transforms a Photo
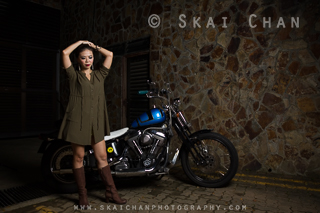
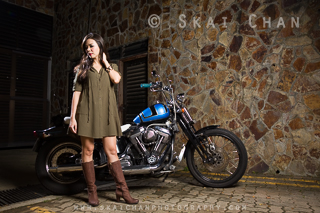
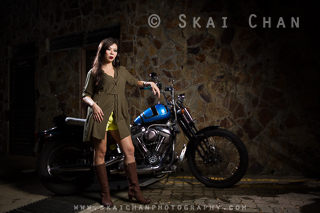
Lighting up a model with a bike at night
 1.
1.
This photo was taken with a mobile phone using only ambient light. The white light above and the orange street lamps created mixed colours that were distracting. The high ISO made the image noisy, and the backlighting did not light up the subjects well.
 2.
2.
I removed the ambient lights and used one main flash on the right. The ISO stayed low for cleaner results, but the left side was too dark and the model blended into the background.
 3.
3.
I added a second light behind her as a hair light. This separated her from the dark background and made her stand out, similar to a street lamp effect.
 4.
4.
To focus on the model and bike, I used a honeycomb grid on the main light. This narrowed the beam and stopped the background from being lit. The bike's back fell into shadow.
 5.
5.
Finally, I added a fill light on the left to brighten the back of the bike. The light spread wider than planned, but it still improved the balance.
All sample photos above are raw and unedited.
Lighting up models during noon time
 1.
1.
This photo was taken at noon with only sunlight. The overhead sun created harsh shadows, leaving the faces dark except for the nose and forehead.
 2.
2.
Brightening the exposure made the faces clearer but overexposed the noses, outfits, and background. Details were lost.
 3.
3.
Adding a soft flash lit up both models evenly. They stood out from the background, and the photo looked balanced. Later, I adjusted the angle to include the street and sky with some rare clouds.
Lighting up models to show details of the sky
 1.
1.
With only ambient light, the faces were visible but the sky and water were overexposed. The scenery details were lost.
 2.
2.
Reducing exposure brought back details in the sky and water, but the faces became too dark. For portraits, the models must be lit properly.
 3.
3.
Adding a soft flash lit up the models while keeping the sky and water detailed. The photo showed both the subjects and the scenery clearly.
Soft Light vs Hard Light
In photography, light can feel soft or hard. Both types change the mood of a photo and how the subject looks.
Soft light is gentle and spread out. It creates smooth shadows and a natural look. Think of a cloudy day near sunset — the light is soft, warm, and flattering. It makes skin look smoother and adds a calm feeling to portraits. Many photographers love soft light for portraits and romantic outdoor scenes.
Hard light is strong and direct. It creates sharp shadows and high contrast. Imagine the sun at noon on a clear day — the light is bright and harsh. It shows details clearly but can also highlight flaws. Hard light is dramatic and works well for sports, architecture, or bold, striking photos.
Choosing between soft and hard light depends on the mood you want. Soft light is best for gentle, emotional moments. Hard light adds power and drama. By understanding both, you can use light to make your photos more expressive and impactful.
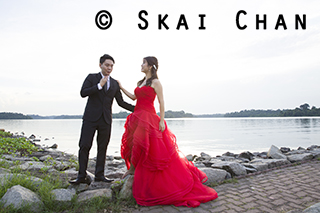
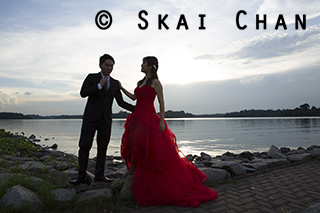
Flash VS Natural Light Photography

Above: Photography using natural light on a cloudy day.

Above: Photography using off-camera flash on a cloudy day. The direction of the light can be controlled and the background can be dimmed to focus on the subject.
Table of Comparison
Here is a simple comparison between flash and natural light. Each item shows which one has the advantage.
| Item | Flash | Natural Light |
|---|---|---|
| Consistency | ✔ | |
| Model's creativity | ✔ | |
| Creative effect | ✔ | |
| Duration | ✔ | |
| Quantity of photos | ✔ | |
| Quality of photos | ✔ | |
| Variety of photos | ✔ | |
| Mobility | ✔ | |
| Permit | ✔ | |
| Comfort level | ✔ | |
| Angle / Direction | ✔ | |
| Background details | ✔ | |
| Uniqueness | ✔ | |
| Sharpness | ✔ | |
| Cost | ✔ | |
| Total | 7 | 8 |
Detailed Pros & Cons
-
Consistency
Flash Photography (advantage)
Flash gives steady results because the light can be controlled. It reduces harsh sunlight and keeps photos consistent. However, under strong midday sun, flash has limits.
Natural Light Photography
Sunlight changes quickly when clouds move. Photos taken in shade and under direct sun can look very different, even in the same album. -
Model's creativity

Above: Professional light (high-end) photography. The model was creative, however, being restricted a lot to the professional lighting's position. For every new spot we wanted to shift over to, we needed to move and test the lighting again. At times, the lighting would need to be redesigned.

Above: Natural light photography. The photoshoot was done using only natural light because of the uncertainty of whether professional photography was allowed. The model was able to roam around more freely during the shoot, given the natural light of that spot was good enough.
Flash Photography
Flash setups can restrict movement. Lights need to be adjusted when changing spots, which may slow the model down. With practice, it can still feel comfortable.
Natural Light Photography (advantage)
Natural light lets models move freely without worrying about equipment. This makes the shoot feel relaxed and natural, encouraging more creativity. -
Creative effect

Above: Night creative conceptual photography using professional lighting to light up the model's face and display the water effect.

Above: Halloween conceptual photography using different colours of lighting.

Above: Art conceptual photography using very directional light to outline the model.
Flash Photography (advantage)
Flash allows control over direction, strength, and colour. This makes it possible to create dramatic shadows, highlight details, or add special effects.
Natural Light Photography
Natural light is beautiful but less flexible. The effect depends on the sun and environment, so creative options are more limited. -
Duration

Above: Studio dance photography using professional lighting. The set-up of the studio and lighting took over an hour. The model had to wait for the testing of each light to get the correct exposure.

Above: Outdoor dance photography using natural lighting. Since no lighting equipment was used, the pace of the shoot was faster. However, we did have to wait for the right time for the good light.
Flash Photography
Flash setups take longer. Positioning lights and testing them slows down the start of the shoot. Each adjustment adds time.
Natural Light Photography (advantage)
Natural light is ready as long as the sun is out. No equipment setup means faster shooting and more spontaneous sessions. -
Quantity of photos
Flash Photography
Because setup and testing take time, fewer photos may be taken in one session.
Natural Light Photography (advantage)
With natural light, shooting is quicker. More photos can be captured in the same amount of time. -
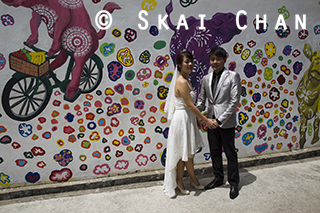
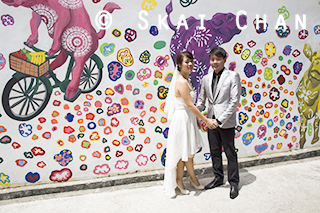
Quality of photos

Above: High-End couple photoshoot with professional light.

Above: Casual couple photoshoot with natural light.
Flash Photography (advantage)
Flash gives a polished, professional look. Controlled lighting creates flattering results, even in tough conditions. Softboxes can make light gentle and smooth, improving skin tones and overall feel.
Natural Light Photography
Natural light can be beautiful but less predictable. Bright sun may cause harsh shadows, while weak light may force higher ISO, adding noise. Quality changes with the environment and time of day. -
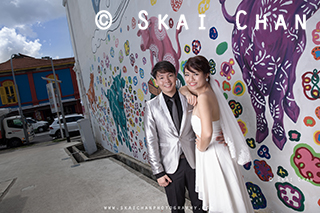
Variety of Photos
Flash Photography
Flash setups are fixed in place. Moving equipment takes effort, which can limit variety in backgrounds and angles.
Natural Light Photography (advantage)
Natural light allows easy movement between spots. Photographers can explore more locations and create a wider range of shots. -
Mobility

Above: High-End bridal photography with professional light. The heavy and bulky equipment restrained our movements and prevented us from further exploring the location.

Above: Hiking photography with natural light. It requires climbing and walking a long distance and hence has to keep to the minimum equipment (probably, just a DSLR).
Flash Photography
Flash equipment is heavy and less portable. Once set up, moving to new places is harder.
Natural Light Photography (advantage)
With only a camera, photographers can move freely. This makes it easier to explore different areas and compositions. -
Permit

Above: High-End outdoor portrait photography using professional lighting. The quality and direction of the natural light were bad. Using professional lighting helped to make the model look more flattered and also eye-catchy. However, we were eventually chased off by the security guard at the last location.

Above: Outdoor runway photography using natural lighting. I wasn't sure if the organiser had sought permission from the building's management for me to set up any external lighting (professional lighting). However, we were lucky that the natural light at that spot was great.
Flash Photography
Using flash equipment outdoors can look more commercial. Some places may require permits or permission before allowing flash setups.
Natural Light Photography (advantage)
Natural light is less intrusive. Most locations allow it without special permission, making it easier for spontaneous shoots. -
Comfort level
Flash Photography
Flash setups attract attention. This can make the model or team feel uneasy when people are watching.
Natural Light Photography (advantage)
Natural light feels familiar. People are more comfortable being photographed without extra equipment around. -
Angle/ Direction

Above: Professional lighting was used to light up the model's face against the sun during sunset - backlighting.

Above: The main light (natural light) was from the sun and thus we can only create a silhouette effect at such an angle using natural light.
Flash Photography (advantage)
Flash helps when the sun is behind the subject. It can fill shadows and allow more flexible angles.
Natural Light Photography
Sunlight direction can limit options. For example, backlighting may only create silhouettes without extra light. -
Background details

Above: Beach photography with professional lighting. The details of the sky were retained by dimming down the entire natural light. The model was then lighted up by professional lighting.

Above: Beach photography with natural lighting. The details of the sky were lost because it was much brighter. Photoshop work may be able to retrieve some details but with limitations.
Flash Photography (advantage)
Flash balances the subject and background. This keeps details in the sky or scenery while lighting the model properly.
Natural Light Photography
Natural light may overexpose the background or underexpose the subject. Details can be lost if the light is too strong or uneven. -
Uniqueness
Flash Photography (advantage)
Flash allows creative effects that stand out. Since many people rely only on natural light, flash photos can look more unique and memorable.
Natural Light Photography
Natural light is common and widely used. While beautiful, it may not create the same distinctive look as flash. -
Sharpness
Flash Photography (advantage)
Flash freezes motion. This reduces blur and makes photos sharper, especially in low light or with moving subjects.
Natural Light Photography
In dim light or with fast movement, natural light may cause blur. Photos may look less sharp without extra lighting. -
Cost
Flash Photography
Flash requires buying equipment like strobes, softboxes, and modifiers. This adds cost, especially for beginners.
Natural Light Photography (advantage)
Natural light is free. No extra gear is needed, making it budget‑friendly and accessible for everyone.
My Lighting Approach in Photography
Making Faces Flattering
My priority is always to make the model's face clear and flattering while keeping photo quality high. Off‑camera flash helps me control the light and make the subject stand out from the background.
Challenges of Professional Lighting
Professional lighting equipment shapes and highlights faces beautifully, but it is heavy and takes time to set up. Once in place, it is less mobile, so I often recommend having an assistant. This setup may mean fewer photos and fewer locations, but the results are worth it. I always explain this to clients so they know what to expect.
When I Use Natural Light
In some cases, I use natural light instead. Sunlight works well when clients want a more casual or authentic look, such as for dating profile photos. Natural light gives a softer, approachable feel while still looking professional.
My Journey with Lighting
When I first started, I relied only on professional lighting for every shoot. I carried heavy, bulky equipment even for casual sessions that didn't need top‑quality results, and I injured myself from the strain. I also faced situations where subjects suddenly asked me not to use my lights. Even in commercial shoots, while companies may have the budget for longer sessions, the people being photographed may not have the time or energy to cooperate with complex setups.
Through these experiences, I realised that in Singapore, flexibility is key. Sometimes polished perfection isn't possible — and that's okay. Imperfection can be its own kind of perfection.
Balancing Flash and Natural Light
Flash gives me control, drama, and professional polish. Natural light offers comfort, mobility, and authenticity. By using both when needed, I can adapt to each project and client preference. This balance is not just technical — it reflects my philosophy that photography should serve both the vision and the people involved.
Choosing Your Light
Lighting in photography is never one‑size‑fits‑all. Natural light and flash both have unique strengths, and the right choice depends on your personal preference and the situation. Natural light brings softness and authenticity, while flash offers control and drama.
The most important thing is your vision. Share your goals with me, and I'll advise whether natural light or flash will best bring your ideas to life. Together, we can create photographs that reflect your story and capture the mood you want.
Get in touch today to discuss your vision, and let's plan a session that matches your style and needs.
please show some appreciation by following me on:
You can also help by sharing this website with friends or communities who may find it useful.
Do check out my other photography tips!
 Scan QR to visit this website